1850 Homestead Mortar and Bricks

Rev 1.23

 Brian Mork - 2016
© 2019 Increa Technology

Site Index  •  Wiki  • Blog

Summer 2016, RM writes:
Anyways, Great site!"

Introduction


house front view

This page documents work to refurbish and improve an 1850 brick homestead.  It is a Federalist style house set on a stone foundation forming basement walls.  Above ground walls are solid 12" brick,, built with 8"x4" bricks.  Joists for first and second floor are set into wall pockets 4" deep.  About 50 years after the original house, a "T" addition out the back was built to house a kitchen and servant quarters. Electricity was brought to the house in about 1935 and forced air heat was installed with a coal burning furnace in the basement.   All the chimneys remain operational. Stainless steel flue liner ducts have been installed for 3 of the 5 fireplaces which have been converted to wood stoves and provide efficient heat.  An oil forced-air furnace with a 4th flue liner serves as backup when we go away during the winter.

house scaffolding

The brick repairs were extensive.  The newer addition needed the most work. It was built 2-bricks thick and the outer layer was missing 1/2 to all of the mortar in places.  The bricks were soft orange-clay bricks fired on site in a kiln furnace.

Engineering Mortar - Theory


People owning older homes use lime mortars.  If you have a brick building prior to about 1860, it is probably built with softer--maybe even hand fired--bricks and a lime mortar.  Portland Cement was not invented until 1824 and it was incorporated into residential homes through the late 1800s.  If you have soft bricks, you need to use a lower compressive strength mortar.  Additionally, older construction techniques count on the brick walls being able to breath water vapor out the mortar joints, which cement mortars will not do. 

bad bricks 
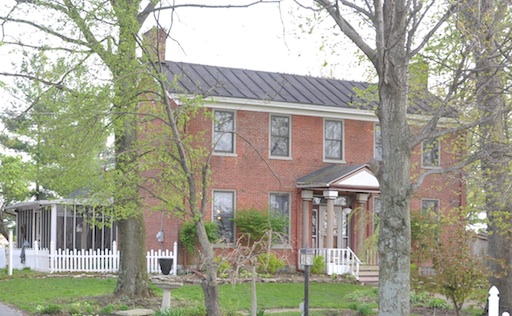
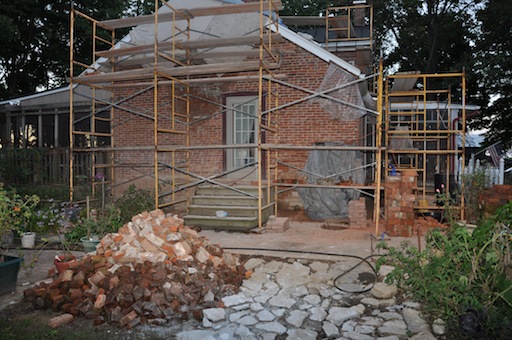
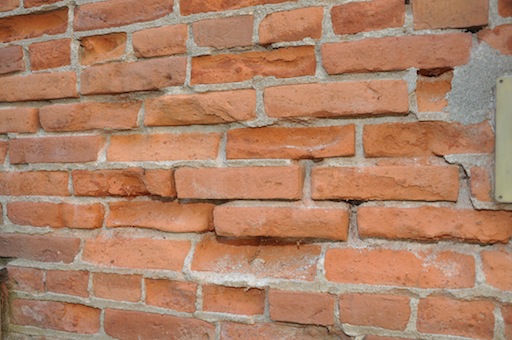
Many modern masons have high volume constructions skills that are not suitable for restoration work. Putting Lowe's or Home Depot Type-N mortar (unrelated to Type-N cement, which we discuss later) on your house older than 1890 is a mistake.  If you want to be convinced, see the photo of one of the additions on my house - it is an 80 year study in how cement destroys your older brick walls.  Well, literally it's not the cement but rather the water in the bricks that wrecks the wall.  However, if the mortar properly let the water pass out (lime not cement), it would not come out through the bricks and destroy them. Although rain and water washing down the bricks is most damaging, simple humidity passing through the wall and freezing on the outside has a similar cumulative effect.

Of course, if you're flipping a house or will be out of it in 2-5 years, 98% of the population will not know the difference, and you could cheaply make it look good and leave it with an unsuspecting buyer.  Somehow that seems wrong.

Lime mortars have been used since antiquity, leveraging the chemistry of the lime cycle.   Crushed Calcium Carbonate (limestone) is heated to drive off Carbon Dioxide, leaving Calcium Oxide (“quicklime”).  This is sold in a powder form and can be prepared for use by the user by soaking in water for several days, generating heat and a lime putty.  More conveniently, it can be commercially hydrated adding water to make Calcium Hydroxide (“slaked lime”), which is conveniently still a powder.  This, in turn, is sold as hydrated lime powder, which when exposed to carbon dioxide cures back to the original Calcium Carbonate while giving off water.  Notice an open bag of lime will slowly absorb water and carbon dioxide over the course of weeks and months, so seal it up tight in plastic if you want it to keep.  Notice lime does not harden with water like cement, but the water allows carbon dioxide is soluable in water allowing it to be absorbed and available for curing the lime.

Here is the cycle of lime, starting with the limestone rock you dig up from the ground (limestone rock is Calcium Carbonate):

CaCO3 -> CaO + CO2  (crush the rock and cook it very hot)
CaO + H2O -> Ca(OH)2  (put water back in; old time done at the job site by "slaking" lime and keeping it as a putty, but in modern days just buy dry calcium hydroxide in bags and add water.)

(use the lime as a mortar at this point)

Ca(OH)2 + CO2 = CaCO3 (the mortar absorbs carbon dioxide and turns back into rock)

Solid material (for example mortar set into place between bricks) doesn’t absorb gasses well, so to properly cure, the calcium hydroxide needs to be kept moist while converting back to calcium carbonate.  That way the carbon dioxide can absorb into the mortar and get to the lime. Lime mortars require misting or moist burlap bag coverage for 4-7 days after being used. 

Different than hydrated lime, hydraulic lime has pozzolan additives that make it set firm in an hour or two instead of many hours.  Additives could be done artificially at a job site, but because of minimal production controls, this is not favored.  Plus, who has large piles of powdered clay, fly ash, or crushed volcanic rocks to use as additives?   At some places in the world “just the right amount of the right stuff” comes out of the ground with the lime …hence “Natural Hydraulic Limes.”  Because it is imported to the United States, it’s pretty expensive – running $45-$65 per 55 pound bag (2016 prices).  The composition is well controlled and comes in three strengths NHL 2, NHL3.5, or NHL5 (the numbers are compressive strength in N/mm2).  This is good stuff if the careful labor of keeping it moist while curing is done.

The problem is that NHL are not used in huge new building quantities so chances are nobody around you carries the stuff.  In south central Ohio, big mortar cement suppliers mostly haven't heard of it.  Two had heard of it before, but were not interested in ordering more than a skid pallet full.  The big distributor is Trans Mineral USA.  One of their very active distributors is LimeWorks.  LimeWorks lists a few retailers in the central and eastern US.

As an alternative, many folks are mixing in small amounts of Portland cement to an otherwise pure hydrated lime mix to make lime mortar set firm quicker yet still show many nice character qualities of lime mortar.  Hydrated lime can be obtained for $4-$8 per 50 pound bag.  There are a few established recipes, which come in different types, delineated in decreasing compressive strength by the phrase MaSoN wOrKs.  The National Park Service (scroll down near the bottom) and the University of Vermont agree on this recipe data, which are all relative volumes of dry material.

Lime in the table is Type-S lime (not Type-S mortar) available at Menards except for the rows with NHL (“Natural Hydraulic Lime”).

Mortar  Type
Cement
Lime
Sand
PSI
Notes
M
1
0.25
3-3.75
2500

S
1
0.5
4-4.5
1800

NHL5
0
1
2.5
725, 127712m
slaps, mortar for hard stones
NLH3.5
0
1
2.5
507, 85512m
base coats, stones
N
1
1
5-6
750
Quickrete 60lb "Type-N" mortar from Lowe's or Home Depot
O
1
1
8-9
350

NHL2
0
1
2.5
290, 757d, 42012m
mortar for weak stones, finishes
"L" (lime only)
0
1
2.25-3
261-725

K
1
3
10-12
75-?


Table Notes:
In addition to compressive strength, it’s important to understand that concrete blocks water vapor flow through the brick constructed project.  It forces the vapor out through the bricks rather than allowing it to pass through the mortar.  The result can be spalling and degradation of soft bricks.  Only the NHL and L mortar do not have cement. NHL cures up a lot quicker like a cement mortar.  It's only technical downside is that it must be babied when curing - keeping it actively moist for 4 days or more.  It is also approximately 9x more expensive!  Assuming a 1:2.5 rate, NHL mortar (lime after diluted with sand) will be about 2.5x the cost of hydrated lime mortar.  The actual ratio we ended up using on our house was 1:2, give a cost about 3x that of hydrated lime mortar.

When combining cement and lime, there have been some studies that the cement crystalline structure competes adversely with the calcium carbonate crystalline structure, and so purists would choose the higher cost pure NHL, while a pragmatic person might use an NPS recipe.

Faster alternative

Instead of buying cement, and mixing with lime and sand, according to the table above, it may be convenient to buy bags of Quickrete Type-N mortar pre-mix (750 psi compression strength) from Lowe’s or Home Depot, and use that as base.  It already has cement and a nice aggregate size distribution.  The downside is you don't know the pedigree or quality of the cement or if the "weaking agent" is lime. And you can't tune the appearance and texture of the sand/stone aggregate.  Some Home Depots are selling only Type-N "Masonary Cement" which makes the same thing as Type-N mortar mix after you add 3 parts equal volume of sand, and you could use an aggregate distribution of your own choice.

If one assumes commercial Type-N mortar is [1:1:5], per the recipe table above, it can be “converted” to Type-K or Type-O by adding only lime and sand.  Ratios in the table are cement:lime:sand.


To make Type K
To make Type O
Start with
7 parts of 1:1:5 (Type-N mortar)

Add
7 parts 0:2:5 (lime and sand)
3 parts 0:0:3 (sand only)
Result 1:3:10 (14 parts) essentially Type K
1:2:8 (10 parts) esentially Type O

Summarizing, 7 scoops of Type-N commerical mortar, plus 2 scoops of hydrated lime, plus 5 scoops of sand roughly makes up Type-K mortar. 7 scoops of Type-N commercial mortar, plus 3 scoops of sand approximates Type-O mortar

One architect recommended old houses with clay bricks be mortared with a mixture of 1 bag Type-N mortar and 1 bag of lime, plus about 12 scoops (1 bag) of sand.  Here's how the numbers reduce using that recipe. Because lime comes in 50 pound bags that are physically larger (in volume) than 55 pound bags of Type-N mortar, there is a maybe a 10% error in the math, but this is often swamped by field conditions and small changes to handle the environment at the job site.

1 bag Type-N mortar, already including cement, lime, and sand in a ratio of 1:1:5, with 7 parts total.
1/7 bag: 1/7 bag: 5/7 bag
1 bag Hydrated Lime 0 : 1 : 0
~1 bag sand  
0 : 0 : 1
Resulting ratio
1/7 : 1+1/7 : 1+5/7
Multiply by 7 to keep ratio but simpler numbers. Approximiately Type-K mortar.
1:8:12

So, this architect would end with with mortar similar to Type-K mortar except it has 2.5x as much lime.  It’s a lot purer lime, and has relatively less concrete.  This is probably good for older, softer bricks if the worker is willing to soak the bricks before applying the mortar and keep them moist for about 4-7 days afterwards -- lime cures a lot slower than cement.

Testing Some Mortars


So working on my house, I wasa thinking to make NPS Type-N mortar from a ratio of 1:1:5.5.  This mataches the "below grade" recipe 1:1:6 printed on the back of the lime bag I purchased.  The "above grade" recipe on the bag was 1:2:9.  From 30-40 years of experience, the mason working with me really wanted to use less sand than these recipes.

All his mental recipes were done with bags and scoops (shovel fulls).  For him, 5 "scoops" was equal to a 5-gallon bucket full up to where the handles connect.  Turns out 1/2 bag conveniently also filled up a 5 gallon bucket.  So.. 5 scoops is about 1/2 bag.

He was comfortable with a bag of cement, a bag or two of lime, and 10-12 scoops of sand, equivalent to a 1: (1-2): 1.1 recipe.  That is a little bit more lime (maybe due to convenience of dumping bags), and LOT less sand.  Mixing half-bag recipes, he really did not want to go over 7 scoops of sand, and preferred 5 scoops of sand.  This means his max-sand was a 1:1.5:1.4 recipe and he wanted to use a 1:1.5:1 recipe.  Basically, he was okay with a higher lime content like Type-N mortar but wanted higher strength by cutting back on the sand aggregates.

I mixed up four types of mortar for comparison.  See the photos below. 

The left two blobs use Type-N cement and Type-S Hydrated Lime from Menards, 1:3:1.4. This is the K recipe with a lot less sand since 1:3:11 was way too much sand for the mason to be comfortable.  By the end of the project we had adjusted to 1:2:1 for the "new" part of the old house.

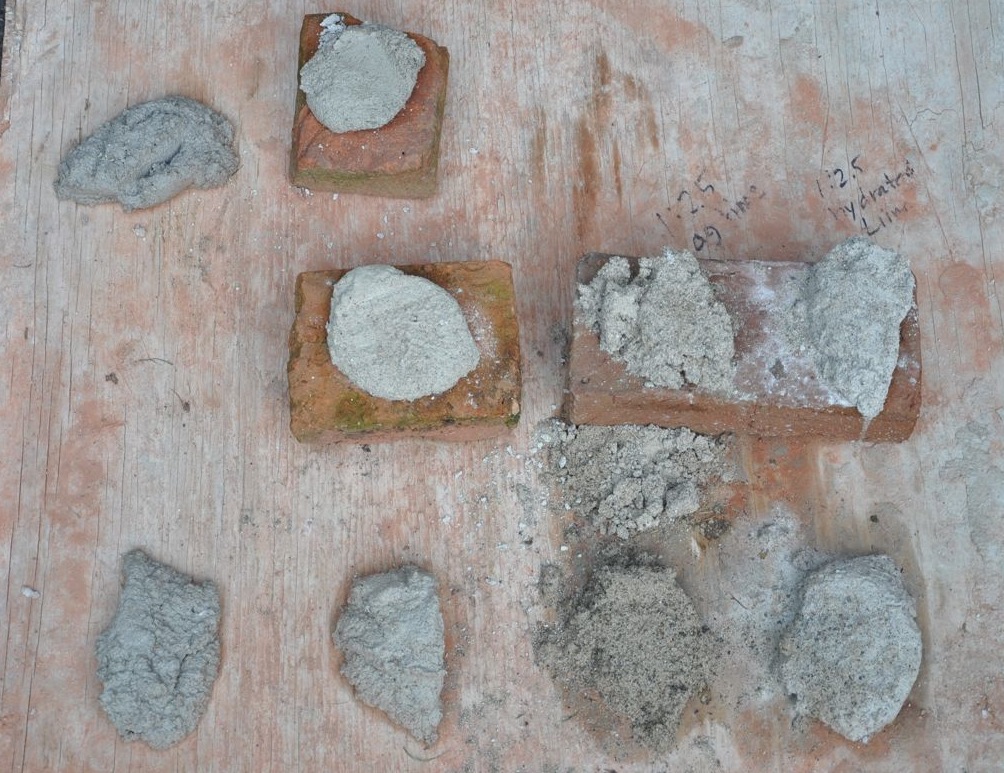
The three blobs middle-left are NHL2:sand 1:2.5 (no cement).  By the end of the project, we had adjusted to 1:2 to make the sand color and texture match better, and reduce a crumbly sand  sensation.

Middle-right is a lime:sand 1:2.5 mortar made with "ag lime" picked up from a local farm store. Don't use ag lime!  It's crush up calcium carbonate which has already cured.  You want calcium hydroxide that cures between your bricks into calcium carbonate.

The right two blobs are a lime:sand 1:2.5 mortar using Type-S Hydrated Lime (not Type-S mortar) from the local Menard's store and sand aggregate that was a clean mix of several sizes of sand. It works, but it looks weak. This is what the ancients used with ratios of 1.5 up to the over-assumed 3.0.
Months later, with the ag lime mix gone.  Equivalent Type K - NLH2 - Type L shown.

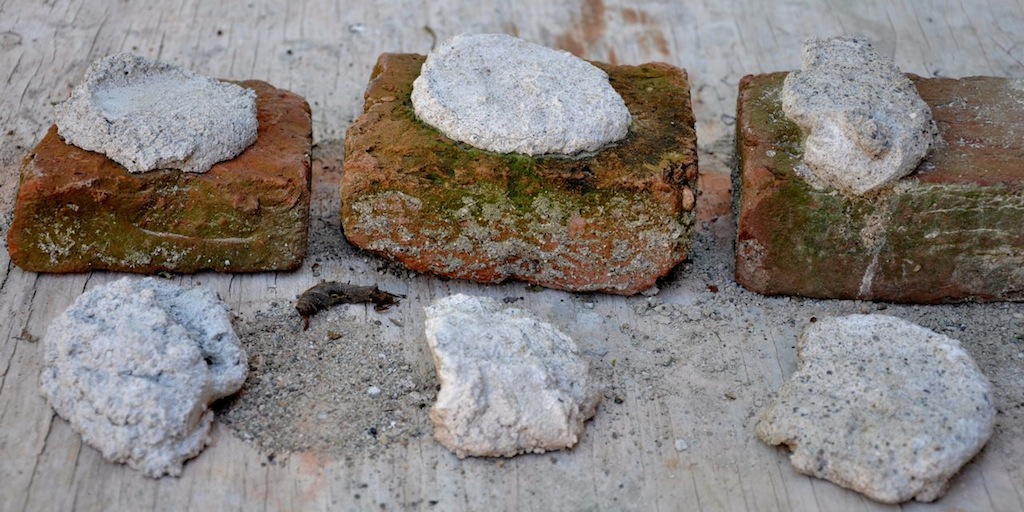
The blob on the brick was doing adhesion tests, and the blobs on the bottom were used for strength tests (punction, cracking, chipping)
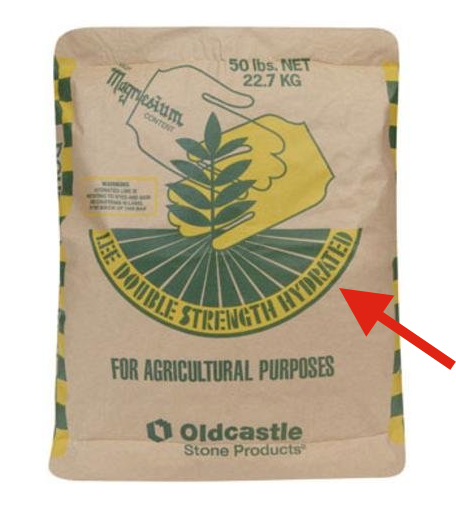

The middle NHL mixture is mathematically the same as the Type-S lime (Type L mortar) far right in the pictures, but the NHL has various prozzolithic impurities that make it set quicker than the hydrated lime formula.  It cures up about the same hardness but behaves more familiar to masons that are used to hard-setting concrete formulas.  Important for my project, it has a softer tan color - not grey like the concrete and not white like the hydrated lime.  The mixed particle size sand made a very close match to the existing mortar on the oldest part of the house.

After 4 days of "keeping moist to cure", Type-K and NHL2 are about the same when scratched with a screwdriver; the Type-L is a little bit softer.  In order to compare compression strength of each to the soft bricks I'm using, I will use a 2" steel ball (the type inserted and locked into a trailer hitch for security) and drop it on the mortar.

The testing idea was this.  I can apply a controlled force to the test pieces by dropping the ball from a controlled height.  F=m*a.  Mass of the steel ball stays the same.  The distance of de-accelerating is assumed to be the same when impacting the test piece, so what I can change is the speed the ball hits the brick or mortar test piece by dropping it from higher or lower: F=m*d*s. I controlled the steel ball speed by dropping it from different heights.  speed = sqrt( 2 * g * height).  So the applied force is F=m*d*sqrt(2*g*d).  Comparing two different drop heights, F2 = F1 * (d2/d1)^1.5.

Here are the data I plan to collected after a week of curing time.  This shows the lowest height required to drop the 2" steel ball to crack the brick or mortar.  The PSI for Type-N is not calculated.  It is looked up in a table and assumed to be perfectly true as F1 in the above formula.  The other numbers are based on this.  So, the relative values are good.  The absolute values are good if the N number starts good.  The goal is to find a mortar that is just slightly softer than the brick, so relative numbers are fine.

Test Article
Ball  Height
Estimated PSI
Observed Effect
Type-N
20"
750

Soft Brick
15"
487

Type-L


NHL2


Type-K


The ag lime will not be tested because it is a total failure.  Don't make this mistake!  Ag lime is crushed rock (calcium carbonate) and adds zero strength to a mortar.  If you mistakenly use this to make a cement/lime mortar, it will appear to harden up due to the cement but will be horribly weak because the lime is acting like an aggregate not a binder. This is a lesson in failure because the lime starts as Calcium Carbonate lime, instead of Calcium Hydroxide lime and hardening into Calcium Carbonate once layed and cured with moisture absorbing atmospheric carbon dioxide.

lime - ag or hyrdrated ?When you're sure you have the right lime, check again.  A prominant DIY help website showed the picture duplicated here on the right side. The picture represents what you'll find out there.  Look at the red-arrow annotation.  It says "hydrated."  Then see "for Agricultural Uses".  Then look at the first sentence of Wikipedia for Agricultural Lime:  "Agricultural lime, also called aglime, agricultural limestone, garden lime or liming, is a soil additive made from pulverized limestone or chalk."
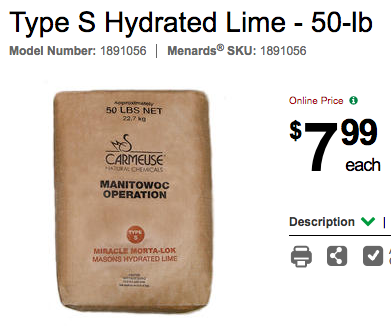
lime hydrated menardsPulverized limestone or chalk is NOT hydrated lime and is NOT the right lime to use in masonry work.  Pulverized limestone and chalk is not the same as hydrated lime.  The product pictured could be hydrated lime or could be ag lime, but it cannot be both!  I know this is confusing because a mason I hired showed up with bags of ag lime and I insisted he not use it.  I ran some test and showed him that Hydrated Lime makes a decent but weaker than Cement mortar.  The ag lime test piece makes nothing - it crumbled when squeezed in our hands. If you build a house out of ag lime, the wall will wash away with the rain and your wall will fall down!

Ask for "Type-S Hydrated Lime"  (which is NOT Type-S mortar that everybody else is asking for).  See the black-banded picture to the left above.  I could not find it at Home Depot or Lowes, but Menards carries it.


What We Actually Used


On the southern addition, probably added early 1900s, we accepted some Type-N cement.  On the original 1850 rectangular 2-story section, we used no cement (only NHL). For the southern chimney on the addition, the bricks proved to be too fragile to properly re-tuck.  The mason used veneer stones (manufactured cement), and modern Type-S mortar (not type-S lime) and the recipe directly off the bag but he doubled the amount of cement; he intended this to be a very hard shell around the old decaying bring chimney.

Numbers below are "Type-N cement: Hydrated Lime: Sand" used on the newer addition of the house. On each line, the first ratio shows 5-gallon buckets for the first two numbers and shovel scoops of sand for the third number, which is what the mason liked to use.  This is mathematically identical to the second ratio, which shows direct volume ratios (cups, pints, buckets, whatever you want).
Numbers below are (NHL 2.0: Sand) ratios by volume used on the original 1860 section of the house.
Used 4 years later.

Weight Bearing with Weak Mortar


An interesting side note is that even with low compressive strength Type-K mortar, a standard 4x8 brick has 32 square inches and so at 75 psi, the mortar between can therefore support 2400 pounds (we assume the brick is stronger, which my experience shows is not true with some soft orange clay locally fired bricks).  With 48 courses of brick on a 2-story house, and about 6 pounds per brick, the bottom bricks and mortar support about 6x48=>288 pounds of static brick weight (roof weight is ignored).  This load is only 1/10th of what the mortar can support. This is true for any thickness of wall because weight and load capability both go up proportionately.

 The mortar below a ½-brick wide and one brick deep joist pocket in the bottom course has an extra 1200-288=>912 pounds it can support.  This allows a joist to carry double that (two ends) of about 1824 pounds.  Subtracting off its own weight of maybe 300 pounds leave about 1524 pounds the joist can support (assuming it does not crack).  The floor board planks use up some of that weight. If joints are spaced 1.5' across a 20’ wide room, each needs to support 30 square feet of floorboards or maybe 200 pounds.  That leaves a usable load of about 1324 pounds per joist.

If 10 people stand on 1 joist, that’s about 2000 pounds, but remember the floor boards will transfer some of the load to the next two adjacent joists.  I can't imagine 10 people huddling close enought to weight down one joist.  It's possible that maybe 10 people would be in one room, but that's distributed across many joists.   I would pay attention if you put two 800-1000 pound gun safes on the same joist.  Of course, in the center of the room, the joist may crack before the brick and mortar starts crumbling.

Back to the roof.  Adding in roof weight must include how many bricks thick the wall is.  We calculated the joints above assuming the joist pocket uses just the internal thickness of a brick.  The outer two layers (8") of brick give up to 4800 pounds per brick of additional support that is not tapped for internal structures – only the roof.   I can't imagine any roof weighing anything close to 4800 pounds per top surface area of brick, so the roof essentially weighs nothing to the bricks.

You may also want to consider lateral loads of roof, wind, and catenary power lines, etc.

Seal the Wall


After mortar work is done, many contractors will seal the wall with a water repelling silane (smallest molecules, 10 years or more lifespan, requires catalyst while applying to slightly damp surface), siloxanes (slightly larger molecules, react with glass, at least 10 year lifespan), silicates, methyl siliconates. 

Saver Systems
Applied Technology

Proseal 3 years later These are ~not~ sealants, like "Thompson's water seal".  For a healthy brick wall, film forming sealants are bad.  Penetrating repellants are good.  It's of like Gortex for bricks - keep water out while water vapor passes through. The bricks have to breath, not receive a waterproof coat or else water vapor will be trapped IN the brick due to temperature gradient condensation.  You'll know if you're buying the correct stuff because good repellants are expensive – maybe $200 for 5 gallons of 7% siloxane, with a coverage of 90-150 ft2 per gallon.  A 40% silane mix may be twice that cost. Kryton Hydropel sells through Home Depot with a coverage of about 100 sqft/gal for soft bricks and costs $97 per gallon.  Ouch.

It's worth noting that you have to protect all glass and most trim paints from overspray or they'll be dulled or etched. 

The picture above is a weather-facing wall after a good rain storm 3 years after the project was finished. I sprayed the repellant on with a pump-up garden sprayer, soaking the bricks starting at the bottom, using enough so that the run-down the wall goes about 9" before getting all soaked into the brick.  In my actual application, I averaged 104 sqft /gallon, so I think I need about 30 gallons of diluted product to do the entire house.

I chose Prosoco Sure Klean (Weather Seal) Siloxane PD repellant and it is still doing a good job.  The 7% siloxane PD "pre diluted" is about $153/5 gal delivered from CoastalOne.com, so that will cost me $918 for the house unless I find a cheaper local supplier.  The Siloxane WB version (dilute 1:9 for "porous vertical surfaces" like my old bricks) runs about about $388/1 gal delivered (10 gallons of diluted product), so that would cost me $1529 delivered.

Looks like the PD is cheaper for me..  To make the WD cheaper, I'd have to use a 1:15 dilution, which gives slightly less concentrated than the recommended 1:14 for "semi-porous vertical surfaces" (new bricks).


Additional Resources

  1. Homeowner NHL-ing his stone house foundation
  2. Dominant buyer-friendly NHL distributor
  3. Lime Mortar: Stone Foundation Friend

Valid HTML 4.01 Transitional


The skeleton of this document was originally created using AbiWord under a Gnome desktop.  It was subsequently edited by Konquerer to become the web page you are reading. Last updated May 2023. Suggestions for changes, comments, and questions are always welcome.  The easiest way is to contact me via e-mail.