The purpose of this lab is to learn about very low-intensity radiation (so low that particle quantization dominates the data collection) and appropriate ways of presenting the statistical data. In addition, you'll have a chance to learn about radioactive sources and solutions, sometimes used as chemical tracers. The Geiger-Mueller counter you'll use is a pulse-counting instrument that uses gas amplification, which makes it remarkably sensitive, but whose simple construction makes it relatively inexpensive. The experiments that are designed to accomplish this purpose deal with the operating plateau of the Geiger tube, resolving-time corrections, probability density functions, half-life calculations, attenuation of nuclear radiation, and the inverse square law.
The Geiger counter consists of two electrodes with a gas at reduced pressure between the electrodes. The outer electrode is usually a cylinder, while the inner (positive) electrode is a thin wire positioned in the center of the cylinder. The voltage between these two electrodes is maintained at such a value that virtually any ionizing particle entering the Geiger tube will cause an electrical avalanche within the tube. The Geiger-Mueller tube used in this experiment is called an end-window tube because it has a thin window at one end through which the ionizing radiation enters. The Geiger counter does not differentiate between kinds of particles or energies; it tells only that a certain number of particles (betas and gammas for this experiment) entered the detector during its operation. The voltage pulse from the avalanche is typically >1 V in amplitude. These pulses are large enough that they can be counted with an external counter directly, without amplification. For the work here at USAFA, we have integral counting/timing units. In this experiment the properties of the Geiger counter will be studied and several fundamental measurements will be made.
You should have five sources available: Barium 137 (Actually, 137Cs, which continuously decays to 137Ba, which in turn is rinsed out of the dropper with a chelating EDTA solution), Strontium 90 (90Sr), Cobalt 60 (60Co), Lead 210 (210Pb) and two split disk sources of Thallium 204 (204Tl). DO NOT HANDLE THE SOURCES WITHOUT GLOVES AND TWEEZERS. If you take radioactive dirt or dust from the sources or containers with you all day, or worse, get it in your body, that's bad.
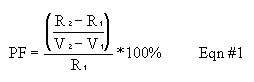
Place the 210Pb source about 2 cm from the windows of the Geiger tube. Set the timer for manual time (so it won't automatically shut off), and slowly increase the voltage magnitude until the counter just begins registering counts. The point is called the starting voltage in Figure 2.2. Starting voltages are rarely greater than 900 V and can be as low as 250 V. Reset the counter, set the timer for 1-min timing intervals, and count for 1 min. Increase the voltage by 50 V or 25 V steps (choose whichever you have time for and will give the better graph) and count again for 1 min. Continue making measurements at intervals until you have enough data to plot a curve similar to that in Fig. 2.2 (but don't try to get the "swoop up" shape at voltages higher in magnitude than V2--you'll damage the tube). The region between V1 and V2 is usually less than 300 V. A sharp rise in the counting rate will be observed if you go just above V2. If this happens, the upper end of the plateau has been reached. Reduce the voltage immediately. Choose the operating point for your instrument at ~50 to 70% of the plateau range. Evaluate your Geiger tube by calculating the performance factor, as defined below. This performance factor, PF, should be less than 10.
 Each
measurement made for a radioactive sample is independent of all
previous
measurements, because radioactive decay is a random process. However,
for
a large number of individual measurements, the deviation of the
individual
count rates from what might be termed the "average count rate" behaves
in a predictable manner. For example, small deviations from the average
are much more likely than large deviations. In this experiment we will
see that the frequency of occurrence of a particular deviation from
this
average can be determined with a certain degree of confidence. In
addition,
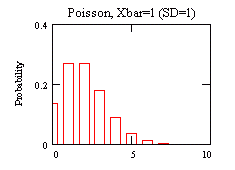
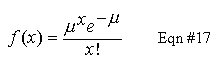
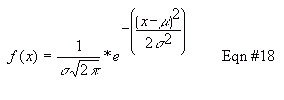
you'll ascertain whether your data fits a Normal or Poisson
model better. You've all seen a Normal distribution ("the curve" for
grades,
for example). You may not have seen a Poisson distribution before, so
there's
an example to the right.
Each
measurement made for a radioactive sample is independent of all
previous
measurements, because radioactive decay is a random process. However,
for
a large number of individual measurements, the deviation of the
individual
count rates from what might be termed the "average count rate" behaves
in a predictable manner. For example, small deviations from the average
are much more likely than large deviations. In this experiment we will
see that the frequency of occurrence of a particular deviation from
this
average can be determined with a certain degree of confidence. In
addition,
you'll ascertain whether your data fits a Normal or Poisson
model better. You've all seen a Normal distribution ("the curve" for
grades,
for example). You may not have seen a Poisson distribution before, so
there's
an example to the right.
Place a source far enough away from the window of the GM tube so that ~20-25 counts can be obtained in a time period. If the background count level is more than this, just use background counts. Without moving the source, take more than 50 independent runs. The goal of the data reduction is to compare the experimental distribution to two models: Normal and Poisson, and ascertain which fits the data better.
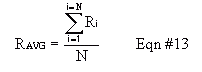
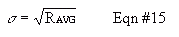
Calculate the average count rate for your measurements using Equation #13. Because the distribution of "counted values" does not theoretically match a Normal (Gaussian) curve, the standard deviation is not calculated the normal way, built into many calculators. Instead, the standard deviation is given by Equation #15. Notice that specifying only the average or only the standard deviation completely defines a Poisson distribution, unlike a Normal distribution where they both have to be specified.
 |
 |
Plot a bar graph histograms of your data and superimpose on the graph a Poisson function generated from your average, scaled to a matching horizontal scale. In Equation #17, use RAVG for mu. Note that, because of the X-factorial (x!) function, a Poisson distribution is defined only for integer x values. This is appropriate for any count-based measurement; you can't have a fractional count value.
|
|
|
|
 |
 |
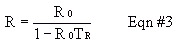
Adjust the geometry so the stronger 1/2 disk give 4000-5000 counts per minute. Placing these sources in the the tray rightside up or upside down seems to make a big difference. Once you decide on the placement of the sources and detector, don't change the geometry for the rest of the resolving time experiment. Place the right half of the source in front of the window, record a 1-min count. Define this count to be R1. Place the left-half of the source along with the right-half and make a 1-min count. Define this quantity to be RT. Remove the right half and count the left half for 1 min. Define this quantity to be R2. After recording many repetitions of R1, R2, and RT, calculate the resolving time (TR) from Equation #2, below. What are the units on TR?

Calculate an estimate for TR two ways, and comment on which is better and why: First, calcuate TRvalues first for each set of data, then determine an average/error. Secondly, calculate average/error in R1, R2, and RT, and then propagate the errors into TR. Because TR is used throughout the rest of the lab, be sure to get a good value. Specifically, take enough data to get less than 50% relative error in your TR value. This may include going back and doing even more measurements of the count values after an initial run through data reduction. If so, be sure to use the same geometry you were using before.
Once you have a TR value, any observed counting rate, R0, you take in lab can be converted to a true radiation rate, R, from Equation #3. Plot a graph of 100% * (R-R0)/R0 (relative error) versus hypothetical R0 values over a range of R0 values that gives approximately 1-10% error. This plot will show you how much error you're getting rid of when you use TR. In addition to resolving-time corrections, be sure to correct for background count values in subsequent experiments.
Note the time when you put 3 or 4 drops of the Barium solution onto a cotton swab in an observation plate, and immediately collect a 1 minute count, using a geometry that gives several thousand counts. Every other minute, again take a 1-minute count measurement. Continue doing this until the count value stops decreasing or until the noise in the count values dominates the decrease in count values. Using the math introduced below, determine what the observed half life is. Compare this to the literature value.
Determine the present activity in Curies of the Cobalt and Strontium sources. Note that your Geiger counter only samples part of the total emission from the source. You'll need to do a geometric correction to estimate the total emission in all directions (a "full sphere" correction) after doing TR and background corrections. Record the activities at the time of manufacture penned on the face of the disks. Look up literature values for the half lives of the isotopes. With these 3 pieces of information, calculate when the decaying elements were created. Compare this to the actual manufacture dates written on the sources.
For any radioactive source, it's true that the disappearance of radioactive material (atoms per second, or similar units ) is proportional to the amount of radioactive material present. Mathematically, -dR/dt = kR. Using this information, derive Equation #16, where R is the measured rate of decay, lambda is a constant, and t is time.
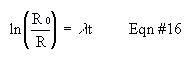
When determining the half life of the Barium, you simply need to plot the above equation (y=mx form) and use the slope. Specifically, plug in the variable t1/2, that you define to be the half-life, the lambda you determine from your data, and what you know the ratio (R0/R) to be, then solve for t1/2. To determine the age of the Co or Sr, simply plug in the values for R and R0, and solve for t. As always, do not forget to determine and discuss precision estimates. For example, include confidence limits with your reported age determination.
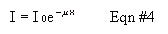
where Io is the original intensity of the beam, I is the intensity transmission coming through an absorber of distance, depth, or thickness x. Mu is defined as the linear absorption coefficient for the absorbing medium. Rearrange this equation to get an equation of the same form as Equation #16, above. The "half value layer" (HVL) of an absorbing medium is defined as that thickness, X1/2, which will cut the initial intensity in half; that is , I/I0 = 0.5. Because we're using rates of decay rather than intensities, this would be written R/R0 = 0.5.
Radiation is not attenuated just by thickness of material; it matters what the material is. Thickness and density contribute to the shielding value of a material. Specifically, thickness times density gives a new term called "density-thickness." With a caliper, measure the actual thickness of the plates you used. Multiply these values by the density of lead. Do you match the units and the numerical quantities of the values printed on the inside lid of the box? Do these errors significantly affect your HVL determination?
Use a source of your choice and the box of lead shielding
plates to
determine the HVL for Lead. Use a source and geometry so you get an
unshielded
intensity of several thousand CPM. Take data for different
thicknesses
from unshielded down to a shielding thickness giving you about 25% of
the
original count. Plot a graph based on Equation #4 where mu
can be
calculated from the slope. As you change the shielding, be
sure to
not change the source to detector distance.
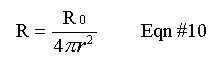
R is seen to vary as 1/r2, when r is the radius of the sphere. The purpose of this experiment is to verify Equation 10.
Choose an appropriate source and set the GM tube at the proper operating voltage. Count for a period of time long enough to get reasonable statistics (~4000 counts) over a range of 2-10 cm. In order to get repeatable and stable distance measurements, set the Geiger tube in a ring stand clamp and lay the sources, in their cradle, on the ring stand base. Note that for the longer distances you can accept lower count values or raise the count time, and then later reduce all the numbers to a counts/minute basis. Which is the better method?
As in the previous tasks, correct the measured activities for dead time and background. Determine R0 for each distance. Should these be the same? Report the average R0 for all the distances. Now, determine R0 an alternate way: plot Equation #10, and use the slope to calculate R0. How do the values compare? Which do you trust?